
Setting Up Your Scanner for PC
Step 1. Connect Your Scanner
- Remove the protective insert from the scanner paper tray.
- Connect the scanner to your computer with the included cable. The scanner is USB powered and must be connected to your computer to operate.

Step 2. Download PictureStudio
Step 3. Install PictureStudio
- Open the PictureStudio installer to begin setup.
If you can’t find the installer, check your Downloads folder. - Follow the on-screen instructions to complete the installation.
Helpful Tips
- If Windows asks, “Do you want to allow this app to make changes to your device?” select Yes to continue the installation.
- If prompted for a license number, enter the serial number located on the bottom of your scanner.
Installation blocked?
Your Windows 11 PC may be in S Mode, which only allows apps from the Microsoft Store. To install PictureStudio, you’ll first need to switch out of S Mode. Click here for Microsoft’s instructions.
Step 4. Clean & Calibrate Your Scanner.
After installation is complete, you will be prompted to clean & calibrate your scanner.
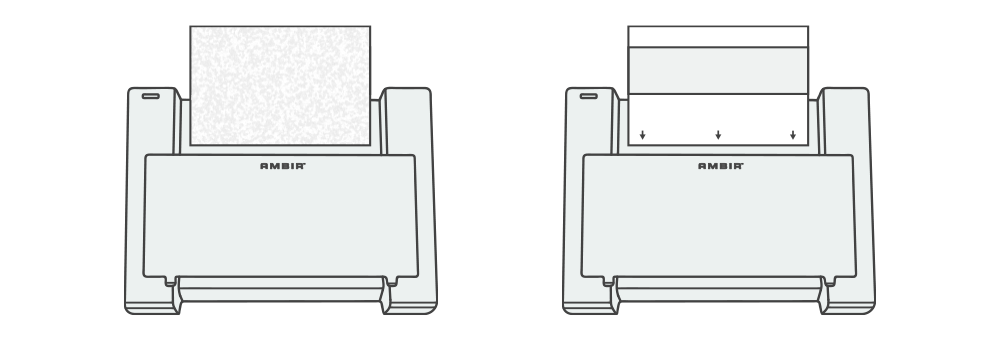
- First insert the included white textured cleaning sheet. Select Clean.
- Next insert one of the black and white calibration sheets into the scanner with the arrows facing downward. Select Calibrate.
Congratulations! You are now ready to begin scanning.

Quick Tips
- The scanner cable must always be connected to your computer to scan.
- Insert one photo at a time into the scanner tray – face down with the top edge first.
- Auto scan is turned on by default so your photo will scan automatically when placed in the tray.
- Look for your scanned image in the PictureStudio Inbox. You can change the scan destination to save directly into an album instead of your inbox.
For additional tips and guidance, refer to the PictureStudio User Guide